Vue3-Vuex
Vue3-Vuex
首先在上个文档的基础上,创建一个 StoreView.vue 页面,并将其链接放入导航栏,同时为其设置路由。
Vuex的基本使用
在 store/index.js 中,有vuex的初始内容,(这里写了很多注释,但后面在使用到该文件时,会将注释全部删除)
2
3
4
5
6
7
8
9
10
11
12
13
14
15
16
17
18
19
20
21
22
23
24
25
26
27
28
29
30
31
32
33
34
35
36
37
38
39
40
41
42
43
44
45
46
47
48
49
50
51import { createStore } from 'vuex'
export default createStore({
state: {
// 存放数据,当state中的数据发生改变时,会重新渲染页面
},
getters: {
// 如果组件在获取state数据时,需要经常对某个数据进行重复的操作,
// 可以将该操作放到getters中统一执行
// getters返回的是一个字典
},
mutations: {
// 用于修改state值 (同步),
// 组件可以通过commit方法进行调用mutations内的函数进行修改
// 需要注意组件直接使用commit,只能进行同步操作,
// 所以直接调用mutations适合逻辑简单,数据简单的修改操作
// 这里建议mutations中的所有函数都只是单纯对state数据修改
// 替换所需要的数据由actions使用commit来提供
},
actions: {
// 用来修改state值 (异步),
// 组件可以通过dispatch方法进行调用actions内的函数进行修改
// 需要注意
// 在actions中,我们主要是对数据进行一些逻辑上的预处理
// 而最终对state数据的修改方式:在actions中,使用commit方法来调用mutations中的函数
// commit方法不仅可以在组件中使用,actions同样也可以用它来调用mutations中的函数
// 为什么要有actions和mutations?
// acitons可以用于异步操作,
// 例如:组件用dispatch的方法给actions传来值
// 但这个值并不是直接用于替换state中的数据,而是需要将这个数据通过ajax传给后端
// 后端获得数据后,可能需要一段时间对该数据进行处理才能将数据回传给前端
// 这是前端需要等待(异步操作),所以需要在actions来执行
// 也有可能actions获得的数据,根据需求,需要等待三秒才修改state的值
// 这种等待,也需要放到actions中完成
// 在所有的异步操作结束后,actions将state中需要修改的数据的值,
// 通过commit方法调用mutations的函数来对state数据进行最终的修改
},
modules: {
// 在实际开发中,需要借助modules来实现vuex的模块化
// 例如:用户有很多数据,商品有很多数据
// 这些数据的使用和操作同样会用到 {state, getters, mutations, actions, modules},
// 所以可以单独为用户、商品设置一个子模块,该子模块具有vuex的全部结构和功能
// 只需要在modules将子模块引入即可
}
})创建一个 user 子模块
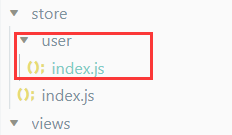
在 user/index.js 中,初步构建
{state, getters, mutations, actions, modules}
2
3
4
5
6
7
8
9
10
11
12
13
14
15let ModuleUser = {
state: {
username: "",
photo: "",
is_login: false,
},
getters: {},
mutations: {},
actions: {},
modules: {}
};
export {
ModuleUser,
}并在 store/index.js 的 modules 中将 ModuleUser 子模块引入
2
3
4
5
6
7
8
9
10
11
12
13import { createStore } from 'vuex'
import { ModuleUser } from './user/index'
export default createStore({
state: {},
getters: {},
mutations: {},
actions: {},
modules: {
user: ModuleUser,
}
})实现一个功能:
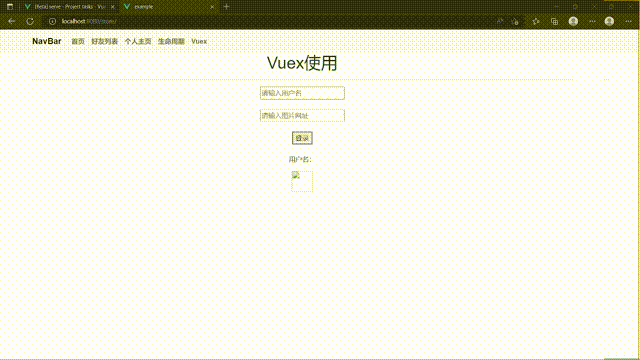
在 StoreView.vue 界面中,用户输入用户名和图片网址后,点击登录按钮三秒后,在该界面显示一张图片和用户名
在 user/index.js 的 actions 中添加一个登录函数,该函数会将 state 中的 is_login 设为 true,并给 photo 和 **username **赋值
2
3
4
5
6
7
8
9
10
11
12
13
14
15
16
17
18
19
20
21
22
23
24
25
26
27
28
29
30
31
32
33
34
35
36
37
38
39
40
41let ModuleUser = {
state: {
username: "",
photo: "",
is_login: false,
},
getters: {},
mutations: {
// 因为actions和mutations是联动的,所以取相同的名称会方便一点
// 这里的state是真正的state,其中的数据是未修改的值,通过state.key可以直接修改对应的value
login: (state, userinfo) => {
state.is_login = true;
state.photo = userinfo.photo;
state.username = userinfo.username;
}
},
actions: {
login: (context, store_data) => {
// store_data是StoreView.vue自己定义的,通过dispatch传来的一个字典
let userinfo = {
username: store_data.username,
photo: store_data.photo
}
// context.commit调用mutations的login函数,
// 同时将需要修改的userinfo通过参数的形式,传给mutations的login函数
// 为了突出actions的异步操作,可以延时3秒后在修改state中的值
setTimeout(() => {
context.commit('login', userinfo);
}, 3000)
}
},
modules: {}
};
export {
ModuleUser,
}在 StoreView.vue 中设计一个页面
template内容
2
3
4
5
6
7
8
9
10
11
12
13
14
15
16
17
18
19
20<template>
<div class="container">
<h1>Vuex使用</h1>
<hr>
</div>
<!-- 这里的username是script中return的,可以不加"" -->
<input v-model="username" type="text" placeholder="请输入用户名">
<br>
<br>
<input v-model="photo" type="text" placeholder="请输入图片网址">
<br>
<br>
<button @click="login" >登录</button>
<div>
<br>
<p>用户名:{{logined_username}}</p>
<img style="width: 50px; height: 50px; border-radius: 50%;" :src="logined_photo">
</div>
</template>script内容
2
3
4
5
6
7
8
9
10
11
12
13
14
15
16
17
18
19
20
21
22
23
24
25
26
27
28
29
30
31
32
33
34
35
36
37
38
39
40
41
42
43
44
45
46
47
48<script>
import { ref } from 'vue'
// useStore可以让组件访问或者修改store的值
import { useStore } from 'vuex';
//
import { computed } from 'vue'
export default {
name: "StoreView",
setup: () => {
// let username = ref('123421');
// 可以往对应的template中的v-model传值,也可以username.value获取到它的值
let username = ref('');
let photo = ref('');
// 实例化useStore,可以用my_store访问或者修改store的值
let my_store = useStore();
// 获取store中的值,并且在页面中显示
// 并且使用computed,可以根据store的值更新而动态改变
let logined_username = computed(()=>{return my_store.state.user.username});
let logined_photo = computed(()=>{return my_store.state.user.photo});
// 登录函数
let login = () => {
// 将用户的输入打包为字典store_data
let store_data = {
username: username.value,
photo: photo.value,
}
// dispatch方法的使用,这篇文章的开头已经讲过了
// "login"是dispatch想要调用的actions中的函数名,store_data数据作为参数
my_store.dispatch("login", store_data);
}
return {
username: username,
photo: photo,
login: login,
logined_username: logined_username,
logined_photo: logined_photo,
}
}
}
</script>结果展示
本博客所有文章除特别声明外,转载请注明出处!